GUIDE: Managing Supplier Certifications in the Compliance Module
If you’re looking to collect and track supplier certificates and automate their renewals, this article is for you.
Supplier certificates, such as ISO or IATF, are essential compliance documents with defined valid-from and valid-to dates. When these certificates expire, it’s important to collect updated versions promptly to maintain compliance and supplier qualification.
With Supplios Compliance module, you can easily collect and manage supplier certifications, specify which suppliers require which certificates, and automate renewal workflows so that suppliers can upload their own certificates.
This article provides a step-by-step guide to setting up and configuring your certificate management automations, helping you eliminate manual certificate tracking and eliminate or significantly reduce manual follow-ups.
Note: You must be a Document Type Admin to set or modify requirement rules and settings for a specific Document Type. You can find more information on Document Type Admin permissions in here.
Creating a Document Type for Certifications
To create a new document type, go to Compliance in the left-hand menu of the Portal. Then, open the Document Types section and click the green Add Document Type button.
In the pop-up window, you’ll be asked to define several key properties of this Document Type.

Document Category
Document Categories are organization-specific and depend on your company’s configuration. Categories can be grouped by department or document purpose, for example:
- Quality Certifications
- Legal Contracts
- Sustainability Documents
If we take ISO 9001 as an example, a suitable Document Category could be Quality Certifications or simply Vendor Certifications.
By default, all Supplios customers start with at least two categories, typically Vendor Contracts and Vendor Certifications, but additional ones can be added easily (contact the Supplios team if you want to add additional document categories).
Kind of Document
Kind of Document refers to the document format. Supplios provides a predefined list: Contracts, Certificates, Policies, Acknowledgements, and Forms.
For supplier certifications, select Certificate.
Document Name and Single vs Multiple Documents
Give the document type a clear, descriptive name (e.g., ISO 9001 Certificate) and specify whether a supplier can have one or multiple documents of this type.
- Most suppliers will have a single document per Document Type (or none, if not applicable). Note that you can still add multiple document versions even if the Document Type is set to allow a single document per supplier.
- However, some suppliers may have multiple documents, such as several ISO 9001 certificates for different plant locations.
Expiration Tracking
Since supplier certificates usually have valid-from and valid-to dates, enable Expiration Tracking to monitor certificate validity and automate renewal reminders. If validity tracking for this certificate is not applicable, you can disable expiration tracking.
For more information on Document Categories, Kinds of Documents, and multiple vs. single document setup, see Compliance Module – Key Concepts.
Setting Requirement Rules
Once you have created your Document Type, you may want to set the Requirement Rules for which suppliers need this document. That will (1) provide you with a visual overview of who needs what, and, (2) if you enable Auto-Pilot for this document type, it will collect new documents from suppliers that have this document set as required (see Auto-Pilot section).
To configure Requirement Rules, go to the Compliance page on the left-side menu, select Document Types and choose the document type you want to manage, then open the Requirement Rules tab across the top. If requirement tracking isn’t enabled yet, click Enable Requirement Tracking.

You can then define which suppliers have this Document Type Required, Optional, or Excluded.
These rules are based on supplier tags, and you can add multiple rules - the system will evaluate them in order until one applies. If no rule matches a supplier, the default rule is used, so make sure to configure that.
For example, suppliers with the tag Approved may have the document Required, while all other suppliers may have it Optional.
After saving the rules, the summary bar will show how many suppliers have the document type marked as required, optional, or excluded.
For more details on setting the Requirement Rules or viewing the Requirement Status Grid, see GUIDE: Setting Document Requirements in the Compliance Module.
Setting up Supplier Uploads of Certificates
To configure supplier visibility, submission steps, and automations (for supplier or internal users), open the Settings tab of the Document Type. This tab includes several configuration sections, but in this guide, we’ll focus on the most relevant settings.
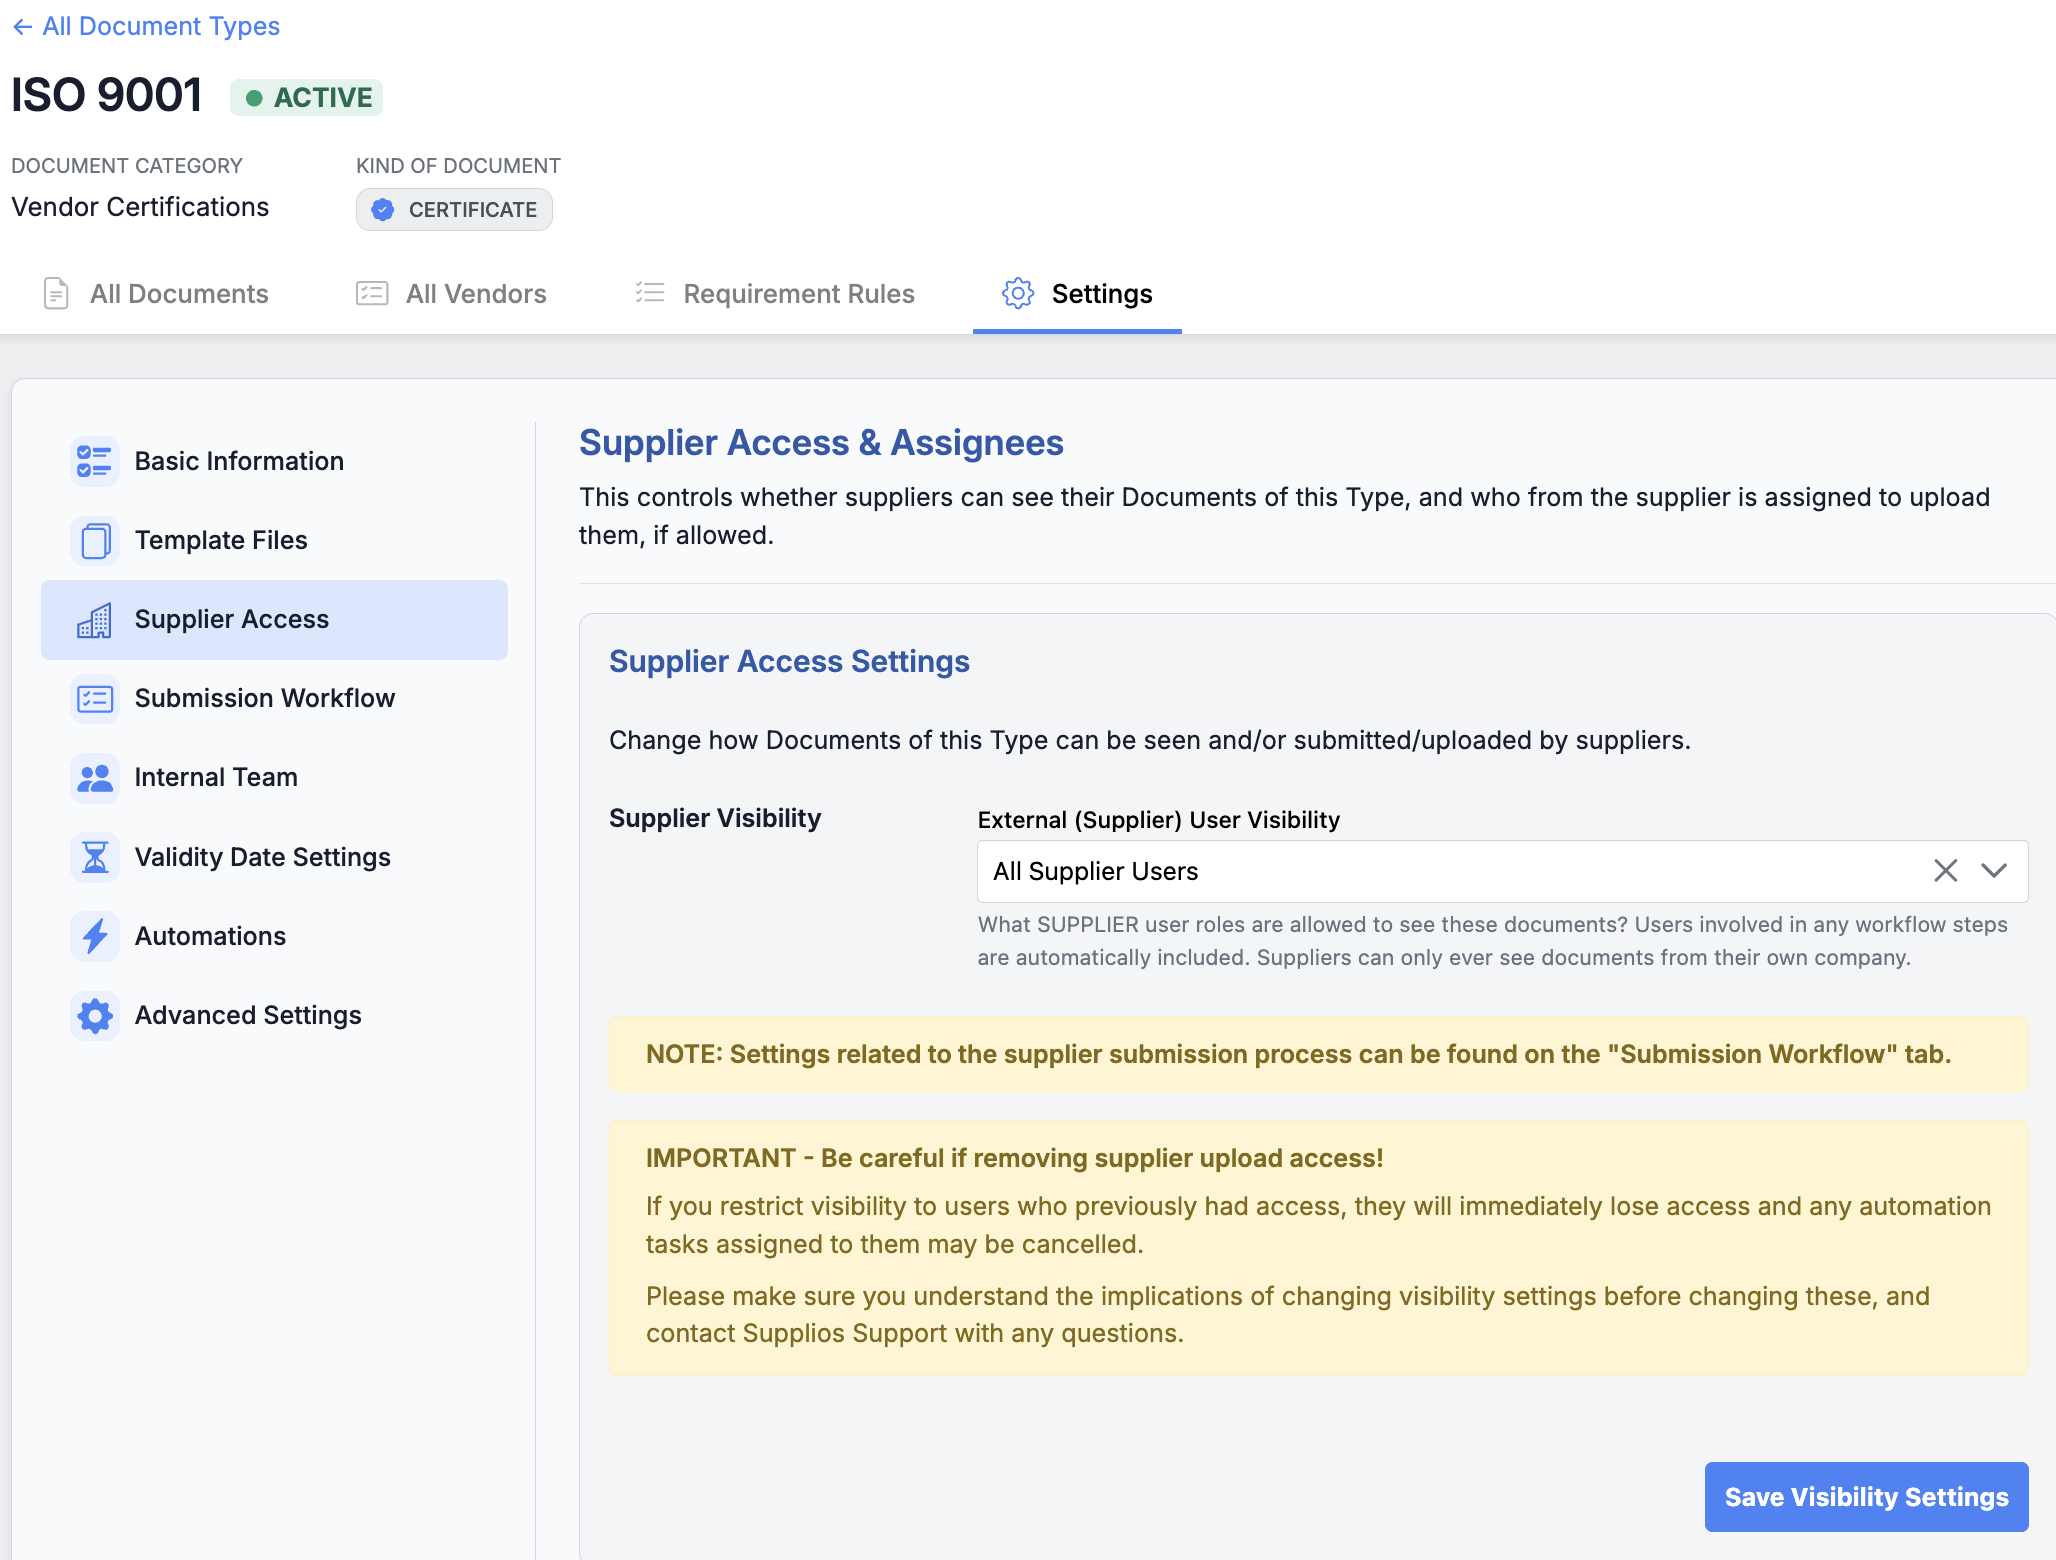
Supplier Visibility
In Supplier Access section, you can enable supplier visibility. By default, suppliers cannot see their documents, however, for certificates, you might want to enable supplier visibility and uploads. To allow access, enable visibility for all supplier users or Supplier Admins only. These users will then be able to view the uploaded certificates.
Note that suppliers can only ever see documents related to their own company, never documents from others.
Supplier Submissions
To allow suppliers to upload certificates themselves, go to the Submission Workflow section and enable supplier submissions. By default, the workflow includes two steps: Supplier Upload and Internal Approval. This means that an internal user must review and approve supplier submissions before they're considered valid. If internal approval is unnecessary, you can disable this step.
Supplier Assignees
Once supplier submissions are enabled, you can configure which supplier contact types should receive upload tasks and reminders. You can do this in the Supplier Access section, where you previously enabled supplier visibility. You can select Supplier Admins, Sourcing Contacts, and/or Quality Contacts. Any user matching at least one selected role will receive tasks. We also recommend enabling Fallback to all supplier contacts in case no users match the selected roles.
Internal Team
In the Internal Team section, you can manage Document Type Admins - users who can configure document type settings, requirement rules, and (by default setting) review and approve or reject supplier submissions for this Document Type.
You can also create additional custom Roles / User groups, and add internal users to those roles. These Roles can then be set as the assignees for Approval tasks, or as the recipients of Internal Reminder Tasks and emails for this Document Type.
Validity Date Settings
In the Validity Date Settings tab, you can define how validity dates are handled. By default, certificates require both “Valid From” and “Valid To” fields. You can adjust this to make dates optional or mark them as not applicable, if needed.
You can also control who can edit validity dates, for instance, if corrections are needed.
By default, only Internal Document Admins can edit validity dates, however, you can enable other internal users and supplier users to edit them as well.
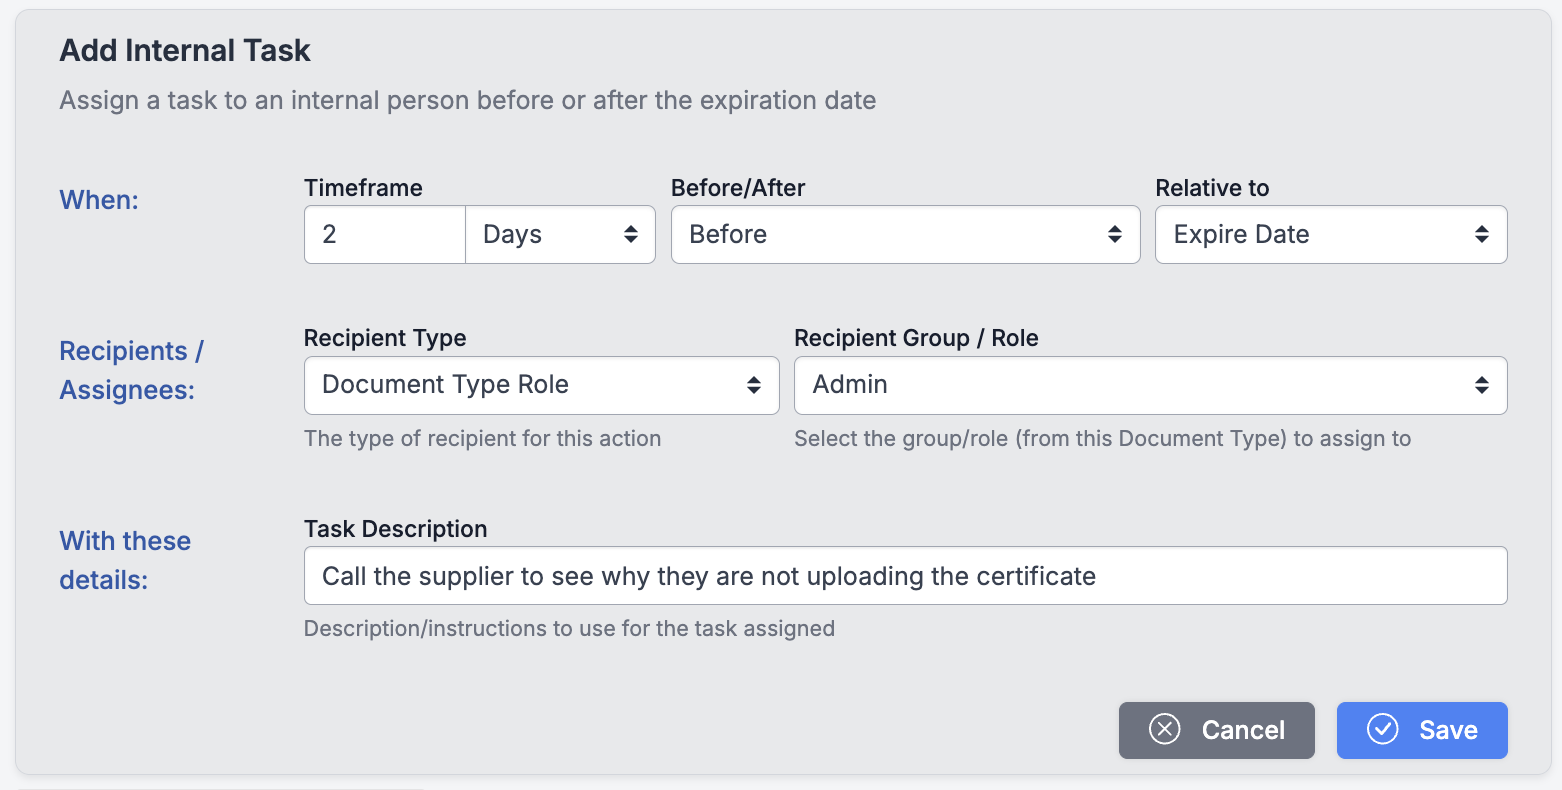
Automations
In the Automations tab, you’ll find the Expiration & Auto-Renewal Settings, as well as options for adding Reminder Tasks & Emails.
Auto-renewal is a feature that will automatically start the process of collecting a new version of this Document from suppliers a certain amount of time before the previous version expires.
Supplier will get an initial email notification with their task, which will live on their dashboard in the portal until it is completed.
Additionally, Supplios can send regular Open Task emails (for example, daily/weekly/bi-weekly) to all internal and supplier users about the tasks waiting on them. To set up Open Task emails for your account, please reach out to the Supplios team.
You typically don't need to set any additional reminder tasks and emails, however, if you wish to do so, you can add extra reminder tasks and emails to internal or supplier users. For example, you could create a task for Document Type Admins to call the supplier if the certificate still hasn’t been uploaded 2 days before expiration.
💡Note: Supplier uploads of new documents with no expired versions are controlled as a separate setting called Auto-Pilot (read more below).
Auto-Pilot
Auto-Pilot is a feature that automatically starts collecting a certificate from suppliers who don't yet have an existing version on file (for suppliers who already have a version, expiring-document collection is handled instead by the auto-renewal setting described above). Auto-Pilot can currently only be turned on by the Supplios team.
Once Auto-Pilot is turned on, it starts collecting certificates from suppliers for whom the document is required, based on your Document Requirement Rules. See GUIDE: Setting Document Requirements in the Compliance Module for more on managing those rules. Suppliers will then receive upload tasks, and the process will follow your existing Submission Workflow settings.
As a Document Type Admin, you can turn Auto-Pilot off at any time - and you'll need to, if you want to change the Requirement Rules for that Document Type. To turn it back on afterward, contact the Supplios team via the blue Help button at the bottom right of the portal.